




Friday afternoon is when a lot of meat rooms find out whether their packing routine is solid or sloppy. Orders are stacked for weekend pickup, the cool room is full, and someone is trying to seal trays of lamb, beef portions, sausages, and marinated stock on one bench with one machine. If the seals hold, service stays smooth. If they don't, you cop purge in the bag, soft seals, relabelling, and stock that starts ageing the wrong way.
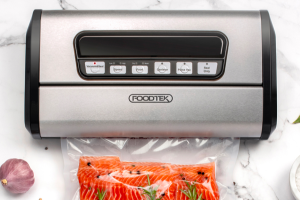
That's why a FoodSaver vacuum pack setup matters well beyond home-use convenience. In a butcher shop, prep kitchen, or small processing room, it affects waste, shelf life, labour flow, and food safety. It also changes what you can sell. A neatly packed eye fillet portion, a stack of steak packs for online orders, or sous-vide-ready catering portions all depend on repeatable sealing, not luck.
Table of Contents
- Why Professionals Master the Vacuum Seal
- Foundations for a Flawless Seal
- Sealing Techniques for Every Cut and Cure
- Labelling Storage and Traceability
- Critical Food Safety for Vacuum-Packed Meats
- Keeping Your Sealer Running
Why Professionals Master the Vacuum Seal
A proper sealing routine pays for itself in the day-to-day work, not in theory. In the Australian meat processing and hospitality sector, vacuum sealing with Foodsaver-style packs reduces food waste by 30–50% compared to non-vacuum packaging, based on a 2024 DPIRD trial in Western Australia. That's the kind of result operators notice quickly because waste shows up in trim bins, markdowns, and staff time.
One practical example says more than a sales pitch. A butcher moving from open wrap and ad hoc overwrapping into consistent vacuum packing can turn a whole rump into organised retail portions, reserve a few heavier cuts for custom orders, and freeze the rest flat without the usual freezer burn problems. The product looks tighter, stores cleaner, and rotates faster because staff can see exactly what's in front of them.
There's also the labour side. When the pack holds the first time, the room keeps moving. When it fails, someone has to open, wipe, trim the bag back, and run it again. Over a week, those interruptions cost more than many shops realise.
Practical rule: Treat vacuum packing as part of production, not as the last tidy-up step after cutting.
In commercial kitchens, the same logic applies before a large function. Portioning beef cheeks, lamb shoulders, or pre-marinated steaks into service-ready packs means the chef gets controlled portions, the cool room stays organised, and the prep team isn't scrambling through mixed tubs during service.
A good FoodSaver vacuum pack workflow also gives you more saleable formats. You can build family packs, pre-portioned grill packs, catering packs, and freezer-ready lines without changing your whole operation. That flexibility matters when trade swings between retail walk-ins, wholesale supply, and event work.
Foundations for a Flawless Seal
Most bad seals are decided before the lid comes down. The machine gets blamed, but the actual cause is usually wet product, poor bag choice, or rough portioning that leaves fat and moisture where the seal needs to bond.

Start with the product, not the machine
If you're sealing beef cuts straight after trimming, don't rush wet meat into the bag and hope the element fixes it. The commercial protocol for high-moisture meats requires pre-freezing to -2°C to stop liquid displacement during extraction. Skipping that step causes 22% of seal failures in abattoirs, according to industry market data on vacuum sealing workflows.
That matters on the bench because purge doesn't just look untidy. It gets dragged into the seal path, weakens the bond, and often leaves a channel leak that only shows up later in the cool room.
For day-to-day work, this prep sequence is reliable:
- Trim for shape: Square off ragged edges and sharp bone points where possible. A neat portion sits flatter in the bag and vacuums more evenly.
- Control surface moisture: Pat down brined, marinated, or freshly cut product before bagging. You're not drying the meat out. You're clearing the seal zone.
- Chill before sealing: For wet beef portions, corned beef, or anything carrying surface liquid, give it a brief pre-freeze so the machine pulls air, not a stream of liquid.
- Leave a clean top section: Keep the top of the bag free from fat smear, spice rub, or protein residue.
A whole rump is a good working example. Break it into steaks for retail, larger slabs for catering, and trim packs for secondary use. Pack each category separately in bag sizes that suit the final use, not whatever roll length happens to be nearest.
Bag choice decides more than most people think
A lot of operators lose consistency by treating bags as interchangeable. They aren't. External FoodSaver-style machines depend on the correct bag structure to pull air properly and finish with a sound seal. Bag thickness and quality also matter once the product hits the freezer or gets shifted around in crates.
Use a bag wide enough that the cut sits flat without bunching at the shoulders. If the bag is too narrow, the product pushes moisture and fat upward as the vacuum forms. If it's too long, staff tend to waste material or fold product awkwardly to make it fit.
For long runs, standardise bag sizes by product line:
| Product type | Better packing approach | Common mistake |
|---|---|---|
| Steaks and chops | One layer, flat presentation, clean headspace | Overfilling so the top edge gets contaminated |
| Sausages | Lay in even rows with minimal overlap | Dropping them in as a tangled bundle |
| Roast portions | Trim corners and sharp points | Forcing bulky cuts into undersized bags |
| Marinated items | Chill first and keep marinade away from the seal area | Sealing straight from a wet tub |
If you need a practical primer on machine and bag compatibility, PSC TRADING Co PTY LTD's guide to vacuum machine efficiency and freshness is one useful reference alongside your machine manual.
A clean seal area beats a stronger machine every time.
Sealing Techniques for Every Cut and Cure
Technique changes with the product. The operator who seals lean porterhouse, wet chicken thighs, cured salami, and soft fish fillets on one default setting will get inconsistent results and blame the sealer. The machine can only work with what it's given.

Match the setting to the meat
For Australian butchers using FoodSaver-style impulse vacuum sealers, success rates drop to 68% when sealing wet or fatty meats without the dry vacuum mode. On the other hand, using the dry setting for pre-dried meats such as cured sausages lifts success to 94%, with seal integrity lasting 12–18 months in -18°C freezer conditions, according to the FoodSaver vacuuming modes guidance.
The key point is simple. Settings aren't decorative. They exist because moisture and fat behave differently under vacuum.
For bench work, use this logic:
- Dry, low-moisture products: Cured sausages, biltong-style lines, or thoroughly dried portions suit the dry setting.
- Wet or fatty products: Fresh sausages, marinated thighs, or fatty lamb cuts need more care because moisture and fat can interfere with the seal.
- Delicate products: Fish fillets or soft cooked proteins benefit from a gentler draw so the texture isn't crushed before the bag closes.
Here's a visual demonstration of machine handling and bag use in practice:
Where operators lose seals
Most recurring faults happen in a few predictable spots:
- Too little headspace: Leave enough room at the top so the machine can draw and seal cleanly.
- Dirty seal path: Fat smear, spice paste, and protein residue stop full bonding.
- Bag wrinkles at the bar: A tiny crease can become a leak path later.
- Overpacked sausages: Sausage links pushed hard against each other can trap pockets of air.
A useful habit is to inspect the seal immediately after packing. Don't just look for a line. Check whether it's even, fully fused, and free from trapped liquid. For long freezer storage, many operators also prefer a second seal above the first when bag length allows.
Examples from the bench
Fresh pork sausages are a classic trouble product. They're soft, fatty, and easy to smear at the mouth of the bag. Lay them in straight rows, chill them well first, and avoid over-vacuuming to the point that the casings distort.
Lean steaks are easier, but only if they're trimmed properly. If the tail of a sirloin portion folds up inside the bag, you get an awkward package that stores badly and looks cheap in the display freezer.
For cured meats, the FoodSaver vacuum pack system works best when the product is completely dry on the surface. That's where the dry mode earns its keep. If you want a deeper look at bag formats and compatibility, this vacuum machine bags guide for freshness and storage is worth keeping on hand.
If a product needs you to fight it into the bag, stop and reset. The bag should suit the cut, not the other way around.
Labelling Storage and Traceability
An unlabelled bag in the freezer is dead stock until someone opens it or guesses. In a commercial room, that's not a small admin issue. It affects rotation, recall readiness, and whether staff use the right product for the right job.

What goes on the label
At minimum, every vacuum pack in trade use should carry clear product identification and enough detail for traceability. For a butcher shop or prep kitchen, a practical label usually includes:
- Product name: Be specific. “Beef” isn't useful. “Rump steak 2 pack” is.
- Pack date: Staff need to know when it was sealed, not when it was cut in theory.
- Use-by or internal rotation date: Keep this aligned with your food safety program.
- Weight or portion count: Helpful for stock control and fast picking.
- Batch code: Essential when multiple animals, deliveries, or prep runs are in play.
Waterproof labels and freezer-safe markers matter more than people think. A faded code on frozen plastic can turn a simple stock pick into a bin-and-replace decision.
How to store packed stock so it stays manageable
Flat freezing is one of the simplest habits that pays off quickly. Freeze fresh packs in a single layer first, then stand them vertically in crates or drawers once firm. Staff can flick through portions like files instead of lifting unstable stacks.
That method works well for:
- Retail steak packs: Easy to count and rotate.
- Catering portions: Faster to pull exact quantities for a function.
- Secondary cuts: Better visibility than piling mixed packs on a shelf.
A clean storage routine also helps with batch separation. Keep each production run grouped, especially when portioning from larger primals over multiple sessions.
For teams setting up a more disciplined bagging process, this practical guide on using vacuum bags covers handling basics that support cleaner storage and clearer identification.
Label before the bag leaves the bench. Once it hits the freezer unmarked, nobody remembers as much as they think they will.
Critical Food Safety for Vacuum-Packed Meats
Vacuum packing protects product quality, but it also changes the bacterial environment. That point gets skipped in too many home-style guides. In trade settings, you can't afford to skip it.
Vacuum sealing changes the risk, it doesn't remove it
CHOICE warns that removing oxygen allows anaerobic bacteria to thrive, which can create health risks even in sealed pouches, as outlined in its vacuum sealer buying guide. That means a vacuum bag isn't a safety shield by itself. It's a packaging method that must sit inside a proper temperature-control and handling system.
Fresh meat still needs disciplined storage. If a seal fails, if fridge time stretches too far, or if product is packed carelessly while warm or wet, the pack can become more dangerous, not less convenient. Vacuum packing slows some forms of spoilage, but it doesn't give staff permission to ignore use-by dates or basic cold-chain discipline.
Operators need to separate two ideas that often get muddled. One is shelf-life appearance. The other is microbiological safety. A bag can still look tight and neat while the product inside is no longer acceptable.
What compliance looks like in practice
In Australian food safety compliance, vacuum-packed meat stored under 4°C must achieve a 5-log reduction in Listeria monocytogenes within 14 days per FSANZ Standard 3.2.1, a threshold met by Foodsaver vacuum bags with 120–150μm thickness that maintain −0.95 bar pressure, according to the DCCEEW packaging compliance reference.
That sounds technical, but the bench-level meaning is straightforward. Your sealing process has to be consistent enough that the pack stays under vacuum, and your storage system has to hold temperature without drift.
A practical commercial routine looks like this:
| Control point | What staff should do | Why it matters |
|---|---|---|
| Product temperature | Pack chilled product, not product sitting warm on the bench | Reduces bacterial opportunity during handling |
| Seal integrity | Check every seal visually and by light pressure | A leaking bag undermines the whole process |
| Fridge discipline | Store packed meat under controlled refrigeration | Vacuum packing isn't a substitute for temperature control |
| Date control | Follow your use-by program strictly | A sealed bag doesn't overrule your food safety plan |
| Batch traceability | Keep packs linked to production records | Critical if product has to be checked or withdrawn |
Vacuum sealing is a control measure. It isn't a licence to stretch time.
For high-volume sites, the biggest improvement often comes from formalising what many teams currently do by habit. Put the checks on paper. Train staff to reject marginal seals. Separate product meant for immediate chilled use from stock intended for freezing. That's how a FoodSaver vacuum pack process supports compliance instead of creating blind spots.
Keeping Your Sealer Running
In a busy room, downtime usually starts with little signs people ignore. The vacuum draw feels weaker. The bag needs a second try. The seal line looks patchy on one side. By the time the machine fails outright, staff have usually been compensating for it for days.

A maintenance routine that suits high-volume use
Repair and gasket maintenance for FoodSaver machines is poorly covered in Australia, with users reporting failures after 1.5 years due to worn gaskets. One useful maintenance tip from a FoodSaver gasket repair video is that storing the machine locked continuously wears out gaskets faster.
That fits what plenty of operators see in practice. Compression parts fail earlier when they're left under pressure all the time.
A sensible routine includes:
- After each shift: Wipe the vacuum channel, clean the seal area, and remove fat or protein residue.
- Weekly: Check the heat strip and surrounding surfaces for buildup or damage.
- Regularly: Inspect upper and lower gaskets for flattening, cracking, or uneven compression.
- During storage: Leave the machine as the manufacturer recommends, rather than permanently clamped shut.
Troubleshooting before you call for repairs
When a machine stops pulling a strong vacuum, start with simple causes before assuming motor failure.
- Check bag placement. If the mouth isn't sitting correctly, the machine may never draw properly.
- Inspect the gasket surfaces. Worn or compressed gaskets often cause weak vacuum.
- Look at the bag mouth. Moisture, fat, or folds near the seal line can stop proper closure.
- Review the product. Very wet or overfilled packs create their own problems even when the machine is fine.
If the machine seals but the bag loses vacuum later, compare a few failed bags. If the leak is in the same spot each time, the issue is often the seal bar or gasket alignment. If failures are random, operator handling is the more likely culprit.
The best maintenance habit is consistency. Clean it before residue bakes on. Replace wear parts before they collapse completely. Train every operator to spot a weak seal as soon as it leaves the machine, not after a tray of product has gone back into storage.
A reliable FoodSaver vacuum pack process isn't about making meat look tidy in plastic. It's about cleaner production, tighter stock control, safer handling, and fewer avoidable losses. In Australian butcher shops, prep kitchens, and small processing rooms, the operators who get the best results usually aren't doing anything fancy. They prep the product properly, choose the right bag, match settings to the cut, label every pack, and maintain the machine before it becomes a problem.
